For the majority of documents, OCR will take effect within a few minutes of uploading. However, with scanned documents/images, FilesAnywhere normally ignores processing them for OCR. Below are some suggestions on how you can ensure that all of your scanned documents are properly processed for OCR.
Note: OCR and Text in File is only available for Professional and Enterprise accounts
Using your Scanner
Most scanners come with software that allows you to tailor the output to your specific needs. When scanning in your documents look for PDF output settings and make sure that the OCR options are enabled. If you're unable to find these settings, we suggest that you consult your scanner's operating manual.
Using PDF creation software
Most PDF creation software now has the ability to create documents that support OCR. This is especially useful for scanned documents or images.
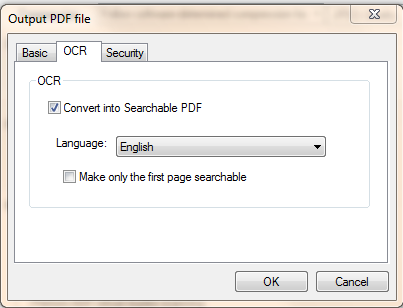
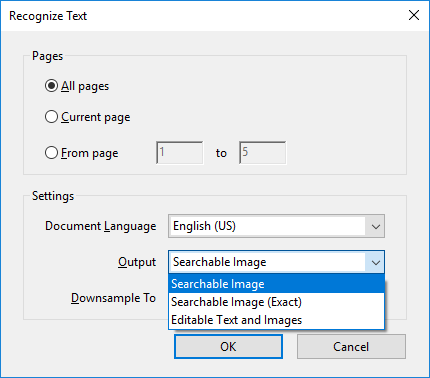
In Adobe Acrobat Pro you simply need to left click on the scanned page, and then right click to access the OCR menu. In Adobe Acrobat Pro's case, it does not matter what Output method you select, all of them will work for the purposes of OCR.
Using ADR Triggers in FilesAnywhere
If the above options aren't available to you, then you can create an ADR trigger that will ensure that all uploaded PDFs are scanned for OCR. While it won't be as accurate as the above options, it will ensure that scanned images/documents aren't ignored for OCR.
Note: Only uploaded files will actually trigger the ADR for text in file. Wait about 5-10 minutes for the process to be completed (depending on queue times) and you should see your text in file.
1) Click on the Tools tab
2) Under the Services section, click on the ADR Triggers button.
3) Click on the Add New ADR Triggers button.

4) Enter in a Trigger Name and keep the default incoming files selections, and choose a folder that the documents will be uploaded into.

5) Under the 'Satisfy all of the following requirements' section, enable the following settings.
A) Change 'Select a requirement' to 'Text in File'. This is the key to forcing the scanned/image PDFs to be OCR.
B) The condition, 'contains the following' will be auto-populated, leave this as is.
C) Enter in any word or jumble of characters, there just needs to be something for the system to search for, it doesn't have to be valid.

6) Scroll down to the bottom and under the 'Perform these actions' section do the following:
A) Switch 'Select Action' to 'Send Email Notification To' the point of this is to trigger an action, but this does not need to go to a valid email address.
B) Ignore the Groups and Users section and enter in a junk email in the Additional recipients section.
C) Enter in a junk email subject and email body.

7) Click on the 'Save Trigger' button to enable the trigger.

Still Have Questions?
If you need help or have additional questions please contact us.
0 Comments